
I’m a little bitter this week about pea soup.
But before I get into that, I want to tell you about all the other things I’ve been up to this past month. So, if you are just here for the pea soup recipe, then you should scroll down, really far, because this is going be a long one…
It seems kind of bizarre to me that not too long ago -10 weeks to be exact, I lived in a completely different world… there wasn’t any food styling at the dinner table. No photographing before the first bite was allowed. No chasing that “magic light” around the house for the perfect exposure. Or forgoing the most romantic table at the restaurant, for the table with the brightest lighting. No blogging- or writing for that matter. Ever. (well, except for checks, but that’s about it). Can you relate? If so, you must be a fellow food blogger. If not, you might seek professional help.
Anyway, that previous life I lived just 2 months ago entailed simplicity (in my book at least), with a part-time job as assistant choreographer/stand-in/assistant stage manager for Celine Dion in her show at Caesars Palace Las Vegas. I know it may sound crazier than the new food blogger hat I’m sporting, but I have to admit, comparatively, it is a piece of cake.

Jennita "standing in" for Celine during rehearsal to test staging & dress/ 2009
After 10 years with Celine, work duties are second nature and low stress- something I would have never believed possible when working with a celebrity. It’s quite chill. However, occasionally there are some minor kinks to work out, that come along with the territory of live theater, like in this short video clip of our first week back at the theater.
But things are pretty calm now after a year of performances. Typically, I’m backstage, and the only stress I have, is praying she has no wardrobe malfunctions to get her back on stage in time. That and making sure she stays hydrated during quick changes. After a decade of hearing the finale song “My Heart Will Go On”- (aka, The Titanic theme song), I’ve gotten quite pro-active during those last 3 minutes. After sending off a quick show report, I even have time to come up with a dinner/shopping plan, ready to get back to the kitchen at the drop of the curtain. On Feb. 22, I didn’t realize that curtain would stay down until June. Celine came down with a throat infection and cancelled an entire run of shows until the summer. That’s a lot of time for cooking.
So what did I do when I heard the bad news? Well, besides “panic” for a few hours, I decided to take advantage of this “quiet” time and dive further in to the food blogging world… and here I am. The following are excerpts of a couple of adventures along the way to help me gain some needed skills to a new food blogger.
First up, was the Food Styling and Photography workshop with Todd Porter and Diane Cu- aka “White on Rice Couple. It was an amazing 2-day class, held at their beautiful photography studio in Orange County, CA. Todd and Diane were completely generous with their knowledge& expertise, and I learned so much. They stressed how it important is to find your individual” food story”, as well as personal creative photography style.

")
We learned many tricks of the trade like:
Styling techniques and how to achieve the perfect shot with lighting styles/positions.
Tethering, (shooting w/ your camera, synced to your laptop so you can tell sooner than later if you bombed a shot or not.)
Using Lightroom, an photo editing program to help store, organize and adjust your photos.


They also showed us how to use props to enhance the shot and give texture. We hand plenty of play time with an different ingredients and an endless selection of plates, glasses, and fabrics from their prop room. I felt like I was in a Barbie dream house. Well, that would be MY dream house if I were a Barbie. (My fiance’s dream house would be quite different. Something more like the locker room of the Pittsburgh Steelers… with a large wine cellar attached).

Todd & Diane taught us how to style food naturally with tips & tricks- and ones that don’t involve motor oil (for fake syrup) or glue to hold things in place. (It really does exist in the professional food stylist world.) I learned that instant mashed potatoes was the cure for many dishes to give more bulk, and to give a platform in which to affix garnishes on soups like croutons or herbs. And although it really does work great for the shot, as a new food blogger (and not a professional), I don’t know if that one works for me. I love eating fresh, mashed potatoes too much more. I haven’t bought a box of instant mashed potatoes in years- shelf space is a premium in my kitchen. I am committed to eat the real food that I shoot for my blog. (And if I don’t, I’ll commit my cats to eat it… and they don’t particularly care for instant mashed potatoes either.)

We also got creative with paints as we each made some prop boards to go underneath our food. So much fun, and what a great idea. Plus, now I don’t have to go out and buy several tables to achieve different looks. That would have been silly. But the thought did cross my mind. Several of the students added cool Martha Stewart textures to their boards, like sponging, raking across, and a faux wood technique. Makes me want to play more and paint my whole house again. But that’s probably a bad idea.

I highly recommend the Food Styling and Photography workshop with White on Rice Couple. I should also add that both Todd and Diane are not only amazing photographers, and teachers, but also fantastic cooks too. The certainly kept us well fed throughout the day with lots of treats. Here’s a link to their blog with their Minted Sangria recipe that was created as a styling exercise that day.

It was so inspiring to be around a great group of fellow foodies who share that same passion for food and photography. Thanks Todd and Diane!

And the following week, Sugar Plum Foodie goes to…..

San Francisco for BlogShop, a 2-day photoshop+blogging workshop.
I’ve been eyeing some cute blogs out there on the web, and I’m always drawn to the ones adorned with some unique, personality bling. After many hours of frustration trying to teach myself with the “Photoshop For Dummies” tutorial, I only ended up with lower self esteem, thinking, I must be dumber than a dummy. BlogShop to the rescue.

Bri Emery of DesignLoveFest.com and Angela Kohler of angleaandithyle.com are the beauties & the brains behind BlogShop, basically a glam bootcamp for photoshop + blogging. I was lucky to snag a seat in BlogShop SF along with 24 other stylin blogger students, one of which happened to be Food Network celebrity, Aida Mollenkamp– how cool is that?? I couldn’t help but wonder why she would need this class. I’ve seen her blog and it looks awesome- in fact, she’s up against Anthony Bourdain and David Lebovitz as a finalist in Saveur magazines’2012 best celebrity blog awards. That’s saying a lot, because those 2 are top dogs in the biz. Doesn’t Aida have a staff of 20, adding bling to her blog at a moments’ request (besides someone responsible for keeping her hydrated and attending to wardrobe malfunction issues)? Guess not, and that makes me respect this food network star even more for empowering herself with the tools to express personal creative vision. Good for her- and good for the rest of us too for rolling up our sleeves and fastening our BlogShop seatbelts.

And boy, did we need to. It was it a wild ride. For someone like me, who had pretty much zip photoshop experience, I’m not going to lie… it was tough, and I struggled to keep up. But, it was also an awesome & inspiring experience. So many possibilities. First, we learned how to resize pictures for the web- and hallelujah, because I was driving myself bananas with all the different size photos in my previous posts. Then we learned how to add a multitude of effects to pictures using different tools.
I think my 2 favorites were the spot healing and liquefy tool, where you can remove blemishes from your portrait shots, give your hair more volume, or shed pounds with a stroke of a brush. What? A SKINNY tool? Brilliant. Worth the $800 class fee right there. There was a gaggle of info to learn and at times I wanted to sling a yo-yo from our fancy goodie bag at my laptop screen. But you know what, I just kept telling to myself to keep calm and carry on. The “undo” button was my BFF. Luckily, they provided everybody with a helpful instructional guide for reviewing and that’s what I did. Over & over… It made the 2nd day so much easier.
I learned how to make fun animation with the photos that were taken of us on the first day. Not knowing how to pose naturally for a normal shot, I resorted to jumping instead. Hmmm, I’m seeing a lot of fun ways to use this animation for before /after (and in between) shots of cooking.

The last thing we learned was how to make mood boards, which I was pretty psyched about. I’ve been noticing them pop up all over fashion magazines and Pinterest, and they are very attention grabbing. Here’s my own (massive) mood board for April. (Forgive me for going over-board. I like virtual shopping a little too much):

- The key ingredient, “Matcha“, in my green tea biscotti w/ pistachios & candied ginger recipe
- What a cool clock…
- Coffee or tea?
- KitchenAid mixer in “apple green”
- Accessorize your cupcakes with these…
- I would feel guilty writing on this– it’s so cool, it I want it anyway.
- Show off a little green in this geometric terrarium….
- Eco-friendly sandwich wraps, a good idea
- April showers bring … this cute polka-dotted, Marimekko umbrella
- My favorite cookware
- What my next cocktail will be…
- Isn’t about time for a vacation? I’m definitely packing this…
- These are so adorbs! I’d wear them, if I were 3 years old…
- I would wear these right now.
And while we’re on the subject of GREEN…

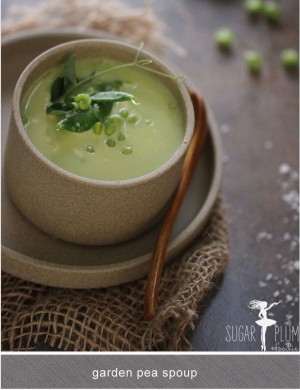
FINALLY, here is the pea soup recipe I promised.
Garden Pea Soup- it’s all about Spring. It’s simple, and inspired from the prolific Bay Area Chef, Alice Waters and her cookbook, ‘The Art of Simple Food”.
So why am I so bitter about this soup?
Because it was the most expensive soup I’ve ever made. $499. pea soup!!! For a recipe that only has a few simple ingredients: peas, water, salt, and a shallot, I expected to prepare this soup for under $1. I only needed to buy a shallot, and I happened to have fresh peas growing in the garden…

Until, unexpectedly, the pea soup killed my kitchenAid blender. I still have no idea why, but the blender sure lost. Guess that’s a sign that I’ll be ordering this in the near future…

The only good thing about what happened (besides, of course, the fact that the soup was real tasty), was that since the soup was still chunky, so I was able to float a garnish on top for a perfect shot. No instant mashed potatoes needed.

GARDEN PEA SOUP
This recipe, adapted from Alice Waters, ‘The Art of Simple Food” really is quite simple with just a few ingredients. I agree with Chef Waters, in her choice of using water over chicken broth so that the flavor of the star ingredient is not masked- That star being shelled “garden peas”; otherwise known as “English peas”. But if these are not available or in season, you can easily substitute with frozen green peas. The big difference between these garden peas and other varietals like snow peas (flat) or the fatter sugar snap pea, is that the skin of the garden peas is tough and fibrous and not pleasant to eat. But the peas inside the pods much bigger in size, and they’re tender and sweet- suitable for this soup recipe.
Ingredients
- 3 Tablespoons butter
- ½ Cup shallots, chopped (approx 1 large/2 med)
- 3 Cups water
- 2 Cups garden peas, shelled (or substitute frozen green peas)
- salt/white pepper to taste
- *optional garnish- a touch of fresh, chopped mint & a dollop of crème fraiche
Instructions
- Heat butter in a medium sized pot.
- Add shallots and sauté on medium low heat, being careful not to brown. (this helps keep the bright green color).
- When shallots are soft, add water and bring to a simmer.
- Add peas and cook until tender, not very long- approx 3 minutes.
- Remove from heat add salt/pepper to taste.
- Puree the soup in a blender. If you prefer a smooth texture, strain the puree through a fine sieve or chinois.
- The soup can be served hot or cold. If you will not be eating the soup right away, be sure to chill down as quickly as possible. (you can place the bowl of soup over a bowl of ice and stir)
- Garnish with option dollop of crème fraiche and/or chopped mint.